Sunday, April 1, 2012

Amputation


My last post was titled "Accidents" (...see 3/12/12), where I described the burning of my left foot while making a cup of soup on a Finger Lakes Trail backpack.

Below are several pictures of the burned foot.
They are not pleasant to look at, so viewer beware.
4 hours after the hot water burn

24 hours

36 hours
Now two weeks later I would like to give blog followers an update.

After five days of self treating I went to the emergency room at our local hospital. The ER physician treated the wound and insisted that I contact the burn unit at the University of Rochester's Strong Hospital.

As you can see the burn was a very serious burn and because I had waited over a week to seek medical help the foot was amputated just above the ankle...Yes, AMPUTATED!


...read on!


April Fool's!


OKAY ... so what really happened?
I did seek medical help from the Krasser Burn Unit at Strong Hospital in Rochester, where Dr. Bell and his staff using general anesthesesia:
1. debrided the granular tissue forming in the central 3rd degree burn area of the foot.
2. took a partial skin graft (a 2x4 sized segment) from my upper thigh and attached it to the 3rd degree burn area of the foot. A very high tech vacuum pump drained any liquids from the wound as well as providing negative pressure to secure the graft to the sub-dermis, insuring a good generative dermis to dermis contact for optimal growth.   
7 days post burn/pre-skin graft.
You can see the 3rd degree burn (whitish tissue)
in the central area.


After the skin graft with the partial vacuum tube in place.
I changed the wound dressing each day.
You can see the healing progress in the next few photos.
11 days after the burn / 6 days after the skin graft.
The 2nd degree burn (outside) are recovering and the skin graft
 (interior with staples) is "beautiful" according the the doctor at Strong Hospital.
(I also have to say that these are my very first body piercings.) 


The skin graft site on my upper thigh.
Doctors wanted the graft covered and open to the air so that
a dry scab would form where it will crumble off with time.
3 weeks post burn/ 10 days post skin graft.
It is looking better.

So tomorrow it is back to the burn unit at Strong Hospital for staple removal and hopefully a release to begin a resumption of activity ...with moderation. Spring is here and there is much to do ...mabe even another backpack.


The END!
Here are two updated photos

30 days post injury/27days post skin graft. The peeling skin is
normal. There is no discomfort and I have resumed full activity,
including daily walks.


The skin graft site 27 days after surgery.
No pain, but it can be a little itchy.
Skin lotion on both sites helps.


Monday, March 12, 2012

Accidents

Last Friday my wife dropped me off south of Hammondsport, NY to backpack along the Finger Lakes trail to Ithaca, NY, 85 miles east by the Finger Lakes Trail. I was making good progress each day, braving snow squalls and some cold night in shelters along the trail. With three days of trekking and 60 plus miles under my belt I was feeling confident about finishing the remaining 22 miles on the last planned hiking day.
Below are a couple of short video clips that give you a brief appreciation of trail hiking.
(Turn up your sound.)

Friday - 3/9 on the trail above Hammondsport.
It's Spring!
Steep trail.
Saturday evening at the Roger's Hill Lean-To, after 27 miles of backpacking for the day; I was fixing myself a cup of hot soup, very pleased with my progress and only one more day before reaching my goal "pull out" point of Ithaca, NY. As I was pouring the boiling water into a my cup the pot jiggled loose from the handle spilling boiling water onto my sock covered foot. I immediately pulled the sock off and poured cold water on the injury.
Too late the damage was done and the hike was over.
(Fortunatly with the warm evening a local ATV rider was able to help transport me to a rendezvous spot where my wife could pick me up.) 


...so here I sit dispite all the rational thoughts; trying to sort this out in my mind to bring some closure to this issue.    

Why !!?
Accident - Any unpleasant or unfortunate occurence involving injury, loss, suffering, or death; a casualty; mishap. - as defined by my old Funk & Wagnalls dictionary.

Caution!
... viewer discretion advised.


Friday, March 9, 2012

Top Loading/Bottom Unloading Vermicompost Bin

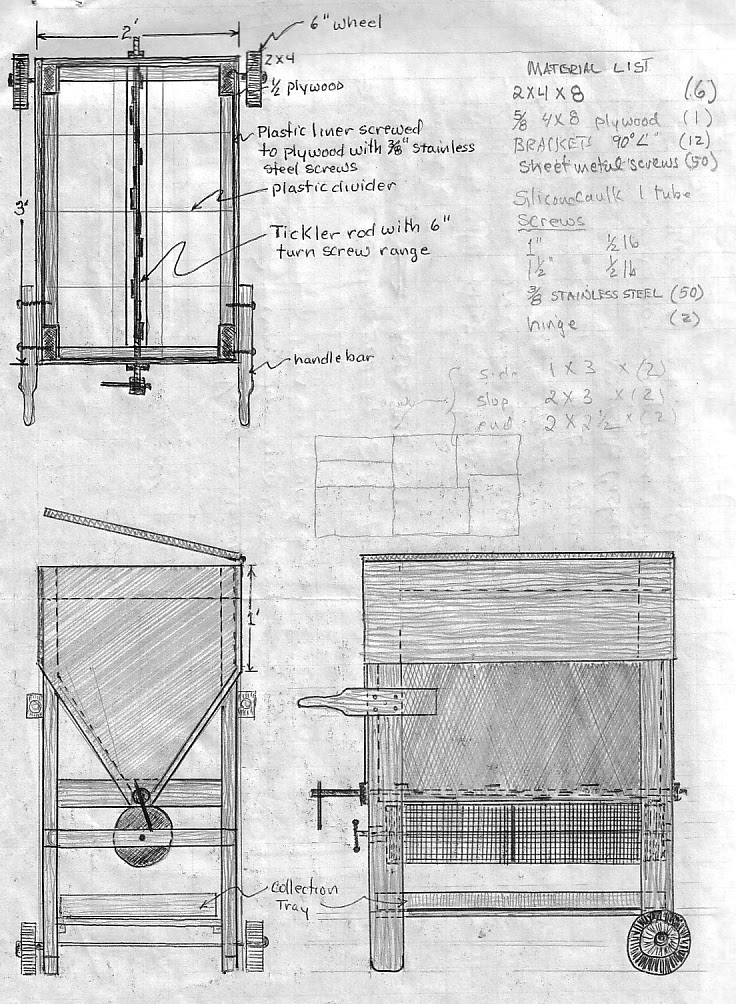
I have been vermicomposting our kitchen waste for over two years. Originally I converted an old guinea pig box into a worm bin. This worked until I tried removing the finished vermicompost, involving the separation of decomposing layers of kitchen waste in order to get at the finished vermicompost. Red worms also had to be removed by hand and returned to the bin in order to access the finished vermicompost. An entirely too messy process to be taking place in my basement. So this is a rather long post sharing my home made, self designed vermicoposting bin.

If you are still interested, read on.

An informal drawing of the homemade,
top loading/bottom unloading vermicompost bin on wheels.
(click on the diagram to see a larger picture of the drawing

The homemade, portable top loading/bottom unloading vermicompost bin.

The plastic lined bin has a turnable "tickler" rod at the
bottom of the bin, enabling finished vermicompost
to be unloaded from the bottom of the bin.
The vermicompost bin contents are covered with newspaper.

Shredded kitchen waste added to the bin several days ago.
(The kitchen waste is ontop of a 0.5cm layer of finished compost
that I periodically add to keep odor down, plus enhance
the bin's biotia.)

Here you can see red worm activity below decomposing kitchen wastes.
(Double clip on the video picture to see a full screen view.)
 Kitchen waste is shredded using a food processor purchased at
a local thrift store. I feel that shredding kitchen waste speeds up
decomposition process.
(Double clip on the video picture to see a full screen view.)
Shredded kitchen waste is spread in the bin.
(...sorry about conservative talk show host, Laura Ingram on the radio in the background. Unfortunately NPR radio wave don't enter the basement.)
Finished vermicompost is "tickled offed" the bottom of the bin by turning the
1m long bar forward and backwards 15cm. A screw drive mechanism from a
basement jackpost was removed and welded onto one end of the winged "tickler bar".
The finished vermicompost falls into a trommel, screening drum made from hardware cloth.
(Double clip on the video picture to see a full screen view.)
The trommel screening drum is rotated forward and backwards with the screened vermicompost falling into the sloped collecting tray underneath. Since the vermicompost tickled off the bottom of the bin is quite damp, screening is repeated over several days.
(Double clip on the video picture to see a full screen view.)
I cover the bin with newsprint that allows me to keep the bin open, yet dark
for worm activity. The bin is then covered with a meshed garden cloth.
(Double clip on the video picture to see a full screen view.) 
I monitor the bin for odors everytime I walk through the basement. Like any active composting process, success often depends on the WONC ratios (water/oxygen - 1 nitorgen/ 3 carbon ratios) by adding more shredded newspring (adding carbon and/or absorbing water) and stirring to move the contents to a more aerobic (with oxygen) vs anaerobic (with out oxygen = unacceptable odor) condition.

Sunday, March 4, 2012

Gone To Pick Up the Sunday Paper.

 I have always liked physical exercise. Back in the 70's and very early 80's I ran competive road races including the Boston Marathon multiple times with fair amount of success. By 2009 - age, time and expense (clothing, shoes, race fees, travel, etc) make walking on local roads the ideal aerobic exercise for me. Sundays are my usual "big" walking days in order to make my weekly goal of 30 miles.

Today's walk shown below is a typical loop, requiring about 4 hours to complete.  

The google map marks today's 15.42 mile walking loop.

Saturday, February 25, 2012

Relief ='s two new totems

On March 27, 2010 I wrote about carving animal totems where several log butts protruded from an interior wall in our log house. At that time I completed three of the five log ends.
[Click on the link below to see that particular blog entry]
The two unfinished log butts are above
the beaver, bear, and turtle heads
For the past few days I have intermittently been working to finish the project started in 2010 with a sharp pruning saw, hand chisels, a rasp, sand paper and my imagination.The original intent (1983) was to create a totem pole affect using NY state animals to entertain our kids as they went up and down the stairs while growing up. Unforturnately for the creative side of life, this relief intent was shelved due to the demands of the work world.

Hurray for the "tiring" work of retirement!  
A frog and a canadian goose
were released from top two log ends.  
When I asked my visiting grandson "What he saw?"
he guessed the frog correctly,

...but when asked about the top figure he said;

"A penquin?"
You know - he might be right!
It does look like a flying "penquin".


'Chendrashaker'

Thursday, February 23, 2012

2010 Leaf Compost Analysis Results are in.

The information below is a fellow up those interested in my January 27, 2012 blog post.

Monday, February 13, 2012

...in Hot Water

In October we had HALCO (http://www.halcoheating.com/) install a direct solar hot water system on our new roof. The goal is to reduce our annual propane use by 50%.
How it works:
An antifreeze solution is pumped through two solar collector panels on the roof. This fluid is then pumped through a coil inside of a large water storage tank located next to our existing propane hot water tank. If the solar panel temperature is 10 degrees higher than the storage tank bottom's water temperature, a circulating pump turns on. Heat from the solar heated solution is then transferred by conduction and convection within the storage tank. When we turn a hot water faucet on for showers, dish washing or laundry; preheated water from the top of the storage tank enters our existing hot water tank, reducing the amount of propane needed to raise well water to 120 degrees Fahrenheit.  
Two solar hot water panels.

Air temperature - 38 Faherenheit in the shade.

The inhouse temperature probe (left) and various
pressure gages for easy system monitoring.
The above video clip was taken at 2:30 PM local time.
  1. The 1st number is the temperature of the antifreeze solution in the panels on the roof. (121 F)
  2. The 2nd number is the temperature at the bottom of the water storage tank. (102 F)
  3. The 3rd number is the water temperature at the top of the water storage tank, which feeds our existing gas heated hot water tank. ( 89 F)
As you can see the water entering our hot water tank is preheated by the sun. Before the solar water heating system was installed, 56 - 57 degree Fahrenheit well water would enter our hot water tank and then have to be heated with propane to 120 degrees Fahrenheit.

The following video clip was taken later (5:35 PM) as the sun is now lower in the western sky. As you can see, the solar panel temperature is down (47 F), but the temperature at the top of the  storage tank is 97.8 degrees Fahrenheit. Water entering the hot water tank will only have to be heated 23 degrees vs 57 degree water coming directly from the well under the old system.


We will be watching our propane bills, so check back in a few months.