I have been vermicomposting our kitchen waste for over two years. Originally I converted an old guinea pig box into a worm bin. This worked until I tried removing the finished vermicompost, involving the
separation of decomposing layers of kitchen waste in order to get at the finished vermicompost. Red worms also had to be removed by hand and returned to the bin in order to access the finished vermicompost. An entirely
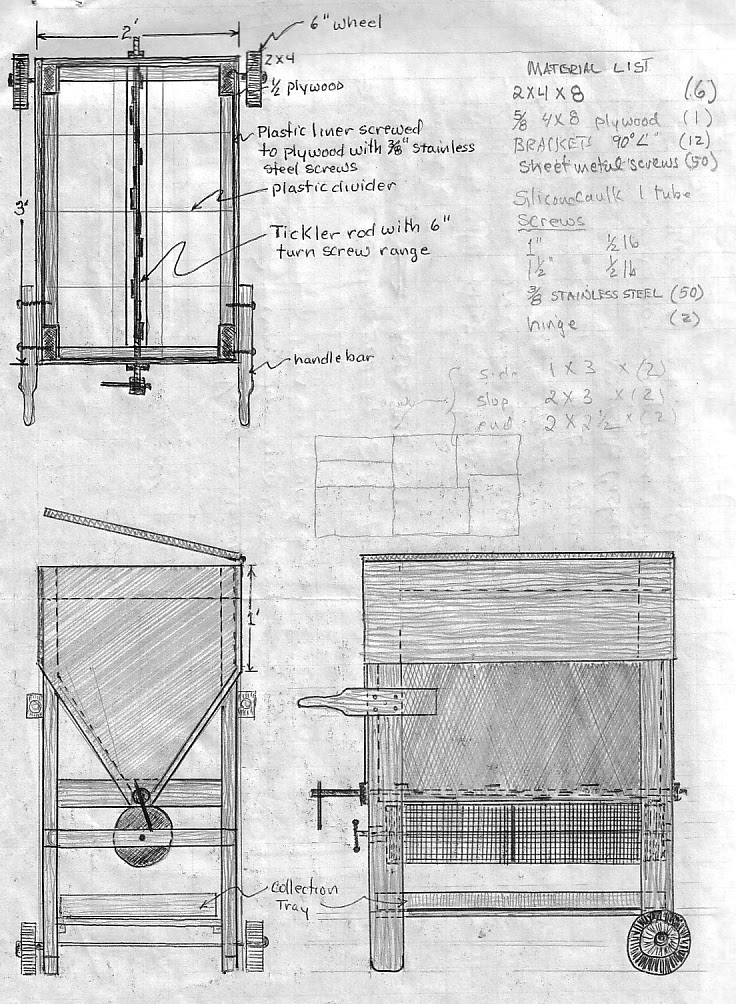
too messy process to be taking place in my basement. So this is a rather long post sharing my home made, self designed vermicoposting bin.
If you are still interested, read on.
 |
An informal drawing of the homemade,
top loading/bottom unloading vermicompost bin on wheels.
(click on the diagram to see a larger picture of the drawing) |
 |
| The homemade, portable top loading/bottom unloading vermicompost bin. |
 |
The plastic lined bin has a turnable "tickler" rod at the
bottom of the bin, enabling finished vermicompost
to be unloaded from the bottom of the bin.
 |
| The vermicompost bin contents are covered with newspaper. |
 |
Shredded kitchen waste added to the bin several days ago.
(The kitchen waste is ontop of a 0.5cm layer of finished compost
that I periodically add to keep odor down, plus enhance
the bin's biotia.)
Here you can see red worm activity below decomposing kitchen wastes.
(Double clip on the video picture to see a full screen view.)
Kitchen waste is shredded using a food processor purchased at a local thrift store. I feel that shredding kitchen waste speeds up decomposition process. (Double clip on the video picture to see a full screen view.) Shredded kitchen waste is spread in the bin. (...sorry about conservative talk show host, Laura Ingram on the radio in the background. Unfortunately NPR radio wave don't enter the basement.) Finished vermicompost is "tickled offed" the bottom of the bin by turning the 1m long bar forward and backwards 15cm. A screw drive mechanism from a basement jackpost was removed and welded onto one end of the winged "tickler bar". The finished vermicompost falls into a trommel, screening drum made from hardware cloth. (Double clip on the video picture to see a full screen view.) |
|
The trommel screening drum is rotated forward and backwards with the screened vermicompost falling into the sloped collecting tray underneath. Since the vermicompost tickled off the bottom of the bin is quite damp, screening is repeated over several days.
(Double clip on the video picture to see a full screen view.)
I cover the bin with newsprint that allows me to keep the bin open, yet dark
for worm activity. The bin is then covered with a meshed garden cloth.
(Double clip on the video picture to see a full screen view.)
I monitor the bin for odors everytime I walk through the basement. Like any active composting process, success often depends on the WONC ratios (water/oxygen - 1 nitorgen/ 3 carbon ratios) by adding more shredded newspring (adding carbon and/or absorbing water) and stirring to move the contents to a more aerobic (with oxygen) vs anaerobic (with out oxygen = unacceptable odor) condition.


Collect your waste material because this waste material are using decomposing for very helpful us.
ReplyDeleteloading and unloading